How to Use the Available 360-Degree Camera
Visibility on the road, trail or parking lot can help make the difference between a moment you’d rather forget and a story you’re ready to share.
When equipped, the 360-Degree Camera system provides a clear view of the environment around your Ford vehicle with the help of cameras on the front, sides and rear.* It works by stitching together images from each camera and displaying them on your SYNC® Technology** touchscreen:
- See what is directly in front of, behind and around your vehicle
- Get a cross-traffic view in front of and behind your vehicle
- View the area outside your vehicle from the top down, including the blind spots
- Gain visibility around your vehicle in parking maneuvers, such as parallel parking, centering in parking spaces and backing into parking spaces
Where Are the 360-Degree Cameras?
Achieving a 360-degree view demands precise synchronicity between four cameras located around your vehicle.
- Rear View Camera – Located in the spare tire carrier, near the tailgate or by the liftgate handle, it provides an image of the area behind your vehicle. The Rear View Camera automatically turns on whenever you put your vehicle in Reverse (R)
- Front View Camera – Located in the front grille, it provides an image of the area in front of your vehicle. To use the front view camera, put your vehicle in any gear except Reverse (R) and then press the camera icon in the corner of your touchscreen
- Side View Camera(s) – Most often used during off-road driving, the side view cameras are located on your outside mirrors and can provide a clear view of your front and rear tires during difficult maneuvers
How to Turn the 360-Degree Camera On
Press the button beneath your vehicle’s touchscreen to bring up the camera view.
How to Change the 360-Degree Camera View
Simply press the button located on your vehicle’s touchscreen. The three most often used views are:
- Normal + 360 View – Contains the normal camera view next to a 360-Degree Camera view
- Normal View – Provides an image of what is directly in front of or behind your vehicle
- Split View – Provides an extended view of what is in front of or behind your vehicle
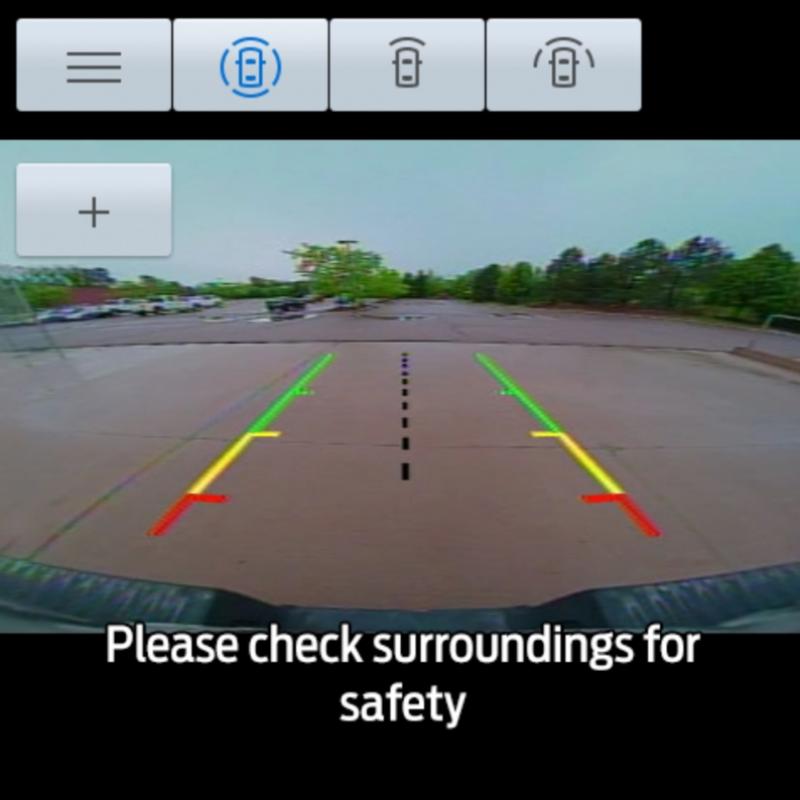
What Are the Active Guide Lines?
Active guide lines have been developed to help make sure you are aware of where objects such as curbs, garage doors and poles are while you are in Reverse. The types of guide lines are:
- Active guide lines
- Center line
- Fixed guide line: green zone
- Fixed guide line: yellow zone
- Fixed guide line: red zone
- Rear bumper
Active guide lines only show with fixed guide lines. Turn the steering wheel to point the guide lines toward an intended path. If the steering wheel position changes when reversing, your vehicle could deviate from the intended path.
The fixed and active guide lines fade in and out depending on the steering wheel position. The active guide lines do not display when the steering wheel position is straight.
Objects in the red zone are closest to your vehicle and objects in the green zone are farther away. Objects get closer to your vehicle as they move from the green zone to the yellow or red zones. Use the sideview mirrors and rearview mirror to get better coverage on both sides and rear of your vehicle.
How to Turn Off the 360-Degree Camera
If you need to turn off your camera system, there is a tactile button located under the touchscreen on the far left.
See your vehicle’s Owner’s Manual for more information about the 360-Degree Camera system.
*Driver-assist features are supplemental and do not replace the driver’s attention, judgment and need to control the vehicle. It does not replace safe driving. See your Owner’s Manual for details and limitations.
**Don’t drive while distracted or while using handheld devices. Use voice-operated systems when possible. Some features may be locked out while the vehicle is in gear. Not all features are compatible with all phones.