Tire Inflator and Sealant Kit
Check out the tutorial to learn how to temporarily fix your flat with the Tire Inflator and Sealant Kit.
What is the Tire Inflator and Sealant Kit?
If you find yourself on the side of the road with a flat tire, you’ve got help. Your Tire Inflator and Sealant Kit can get you to your dealer for service. Instead of a spare tire, this kit provides a temporary repair. Once repaired, check your owner’s manual or the kit itself for guidance on speed and distance limitations, then head directly to your dealer to repair or replace the tire.
If you have a puncture in the sidewall of your tire, or a puncture larger than .24 inches, contact Roadside Assistance.
How Do I Know Which Kit I Have?
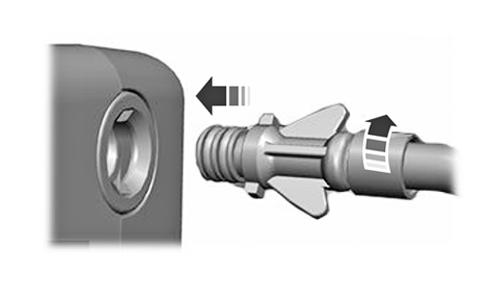
There are two kits available, Tire Inflator and Sealant Kit with dial and Tire Inflator and Sealant Kit with two ports. They both operate similarly — one notable difference is the kit with two ports requires that you attach the hose to the body of the kit before using.

For the kit with two ports, you’ll need to insert the hose end with the winged twist connector into the housing of the kit as indicated. Twist clockwise until you feel the connector lock, and then you’re ready to use your kit. The hose can connect to two different ports in the housing, allowing you to distribute sealant or air.
For the Tire Inflator and Sealant Kit with dial, the hose is already connected and ready to use. You’ll notice a dial on it that can be adjusted to distribute sealant or just air.
Your Owner’s Manual can help you confirm whether or not your vehicle is equipped with a Tire Inflator and Sealant Kit and what type of kit you have.
Where is My Kit?
It may be located in the trunk, luggage compartment, or under the front row passenger seat. Refer to your Owner’s Manual under “Tire Inflator and Sealant Kit” to find its exact location.
How Do I Use My Tire Inflator and Sealant Kit?
Follow instructions for your vehicle in your Owner’s Manual under “Tire Inflator and Sealant Kit.” For vehicles equipped with SYNC® 4A, you can also navigate to the Owner’s Manual from the “Home” section on your infotainment system.
First, park in a safe area:
Turn on hazard lights and apply the parking brake.
Do not remove any objects from the tire like nails or screws.
If the puncture is in the tire sidewall, call Roadside Assistance.
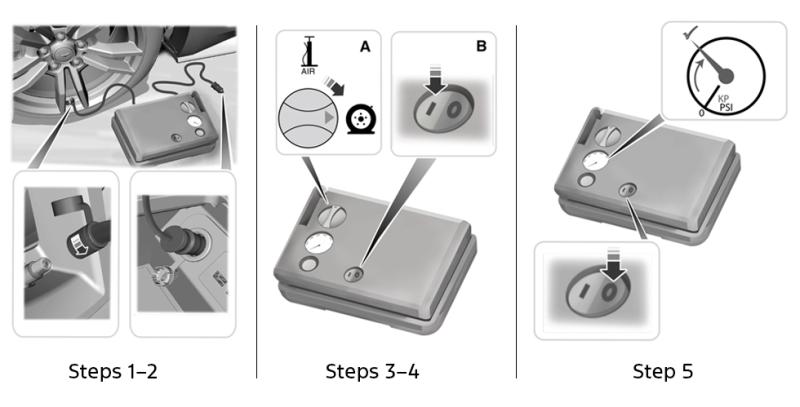
Tire Inflator and Sealant Kit with two ports

Next, follow these steps:
- Remove valve cap and fasten hose to the sealant port. Turn connector clockwise to tighten. You’ll also need to attach the hose to the connector located on the side of the kit.
- Plug power cable into 12-volt outlet.
- Remove warning sticker and place it in a safe space you’ll notice while driving, such as the top of your instrument panel or the center of your dash, as a reminder to adhere to the speed and distance limitations.
- Turn the kit on. Inflate tire to proper pressure specified on your Safety Certification Label inside the driver’s side doorjamb.
- Turn off kit. Unplug the power cable. Disconnect hose from tire and replace valve cap. Disconnect the hose from the kit body for storage.
- Drive five miles to evenly distribute sealant and then recheck pressure. Add more air if needed.
Troubleshooting
If the tire does not inflate to proper tire pressure within 15 minutes, call Roadside Assistance.
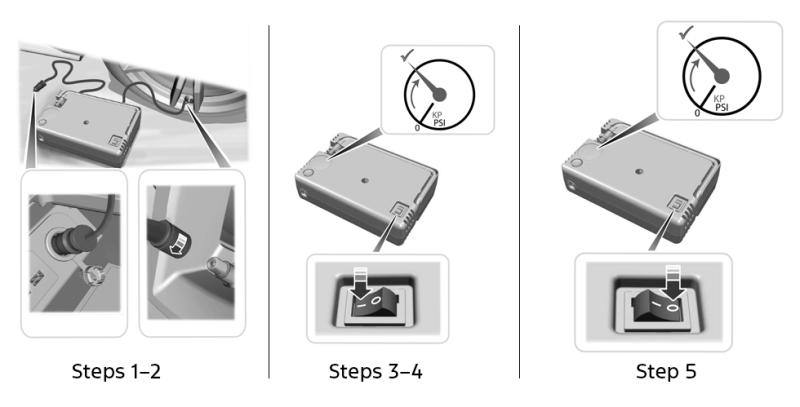
Tire Inflator and Sealant Kit with dial

Next, follow these steps:
- Remove valve cap and fasten hose. Turn connector clockwise to tighten.
- Plug power cable into 12-volt outlet.
- Remove warning sticker and turn dial to “sealant” position. Place the warning sticker in a safe space you’ll notice while driving, such as the center of your steering wheel, as a reminder to adhere to the speed and distance limitations.
- Turn the kit on. Inflate tire to proper pressure specified on your Safety Certification Label inside the driver’s side doorjamb.
- Turn off kit. Unplug the power cable. Disconnect hose from tire and replace valve cap.
- Drive five miles to evenly distribute sealant and then recheck pressure. Add more air if needed.
Troubleshooting
If the tire doesn’t inflate to proper tire pressure within 15 minutes, call Roadside Assistance.
How Can I Replace My Kit?
Your Tire Inflator and Sealant Kit contains enough sealant in the canister for one tire repair only. Visit your dealer for replacement sealant canisters.
Can I Use My Kit With Other Inflatables?
Yes, you can use your kit with other inflatables. See your Owner’s Manual for details.
Related Topics
What is the recommended tire pressure for my vehicle?
How do I check the tire pressure?
How often should I replace my tires?